Friday, March 10, 2017

Surfcasting Tips for Beginners New Zealand

with Allan Burgess

In Surfcasting Tips for Beginners New Zealand, we’ll cover what you need to get started catching fish from the beach. We’ll also give you some quick and easy tips on the tackle required, how to rig your gear, along with when, where and how to fish.

Surfcasting is perhaps the most leisurely form of fishing there is. I often associate the sport of surfcasting with lazy summer days spent at the beach with the kids, especially over the Christmas holiday period. At such times we would pack up the car and head off for camping holidays at places like Mokihinui, Karamea, Ross and Hokitika, on the South Island’s West Coast.

The car would always be “overloaded” with camping and fishing gear. So much so that on one trip the rear axle on the old Toyota decided it couldn’t take the strain any longer. As the old car groaned, it’s suspension floored, the axle gave out! This slowed the trip only slightly as we waited in Nelson for several hours for it to be fixed. For some reason, we always seem to take too much gear along. This is a very difficult habit to break!

We would spend lazy days under the hot sun, interrupted only by the occasional glance up at the rod tip. This would be followed by a sudden frenzied winding of the handle when a fish would take the bait.

Many readers will be unaware that at Karamea, for example, the vista of white sandy beach, blue sky, and cobalt blue

sea has more in common with a tropical island paradise than it does one’s usual vision of the wet and wild West Coast. It is a secret that is starting to get out, though, as the number of overseas tourist in hired campervans at these places in high summer has increased noticeably in recent years.

The West Coast is one of the best places in the South Island to catch an elusive snapper while surfcasting. There are always plenty of kahawai about too. I would also like to point out that over the winter months the West Coast beaches offer some of the best surf fishing to be had anywhere. Elephant fish, huge red cod, various sharks, and kahawai can be caught in the sort of numbers that will come as a big surprise to surfcasters more used to fishing Canterbury’s beaches on the other side of the alps. Getting together a group of surf anglers for a trip to Hokitika, or even Haast, is a great idea at this time of year when the weather is inclined to be more settled.
One of the best things about getting into surfcasting is that it need not be expensive. Nowadays surf rod and reel sets can be purchased at crazy prices that just a couple of years ago were unknown. New 12 foot rod and reel sets are now selling for under $100. Aside from the rod and reel all you need is some monofilament fishing line a few sinkers, hooks, and some bait, and you are in business.
Surfcasting Tips for Beginners New Zealand Athol and Don
These anglers Athol (left), and Don, have a great deal of surfcasting experience between them. Their old fibreglass rods have taken plenty of fish while surfcasting. You don’t need expensive gear to catch fish!

Surfcasting Rods

Here are a few tips aimed at those buying surfcasting gear for the first time. The most important thing of all is the rod.
Casting Weight: In my view, you need to buy a rod that is designed to cast at least 100 gms, which is about four ounces. Anything less than that and you are wasting your time. With a reasonable surf and tide running, you need to be able to cast out a heavy sinker that will hold on the bottom. The heavier sinker and correspondingly stronger rod required to cast it will also prove invaluable when casting into any sort of headwind. Don’t forget that the bait will also add both weight and wind resistance when casting. If you have the option get a rod designed to cast between 150 to 200 gms, or in the old imperial measures that is 6 to 8 ounces. You can often find a good used surf rod in second-hand stores.

Rod Length: You need a rod that is at least 12 foot (3.66 metres) in length. If you have a choice, and can afford it, go for an even longer rod if possible. A 14 footer is ideal for surfcasting. Personally, I prefer a 15 or even 16-foot model when fishing the rough surf. Longer rod length is needed for casting any sort of distance. Although it is true that the longer the rod the greater the leverage advantage you are giving up to a fighting fish. The most important job your rod must perform is that of tossing your baited hooks and sinker out over the breakers. Most experienced surfcasters fish with several rods at the same time. I like to cast out baits on two surf rods and a then fish a spinner on a third rod for kahawai. Sometimes as a bonus a salmon or sea-run trout will take the ticer intended for kahawai. After fish with different rods at the beach, you will find you prefer some rods more than others.
The author with long surf rod. Note that most of the curve is in the top half of the rod. Surfcasting Tips for Beginners New Zealand
The author with a long surf rod. Note that most of the curve is in the top half of the rod.

Rod: Fast and Slow Action
When the sea is very calm, particularly on a steeply shelving shingle beach, a long rod and heavy sinkers are not so important. Often, in such conditions, a long cast will work against you as you could well be casting over the heads of the fish that can be feeding in the stirred-up water right behind the first breaker. However, these calm conditions cannot always be expected. They will be the exception rather than the rule! It is easy to shorten the distance of your cast in calm conditions whereas a short sloppy rod will be useless when you need to cast a longer distance.

I first started surfcasting with an old Kilwell solid fibreglass rod. It was a 12 footer. I’ve rebound new guides on to it so many times I’ve lost count. From memory, I think it had a sticker saying which model it was but this has long since disappeared! I think it was a Beach Baron. By today’s standards, it is an ugly old thing but I sure caught some fish on that old rod, including half a dozen big sevengill sharks from the beach at Birdlings Flat, on the south side of Banks Peninsula. The biggest measured 8 foot 3 inches. That old rod had a very slow action. That is to say that under load it bent on an even curve along almost all of its length.

Today I prefer a fast action surf rod. A fast action means that under load, either from casting or fighting a fish, most of the bend in the rod will take place in the upper third of its length. The bottom two-thirds of the blank will hardly bend at all. A powerful fast action rod is much better for distance casting. It will also have the power to spare when casting a slightly heavier sinker.

It is worth noting that a good surf rod from a top line manufacturer, such as Kilwell Sports, will have it’s optimum casting weight written on the side of the rod blank, down near the handle. Usually, there will be a casting weight range displayed, such as 80-110g (3-4 ounces). I’d be immediately suspicious about buying any rod that didn’t display it’s “recommended casting weight” range in this way. Kilwell Sports is a New Zealand company based in Rotorua. They have manufactured and exported fishing rods the world over for decades. Take a look at Kilwell’s range of surfcasting rods.

It is also worth mentioning that many, falsely, believe that the manufacturer has probably allowed for a bit of leeway either side of this recommended casting weight range. Following this logic, they stick on a much heavier sinker with disastrous results. The rod breaks in half when they try to cast with it! However, you are sure to find that, as with most rod blanks, the rod will cast better at one end of this range than it does at the other. A rod that is not fully loaded during casting won’t find you as much distance. Salmon anglers who fish the surf will be well aware of this. Going from a 55 g ticer to a 68 g model will often improve casting distance noticeably. This is because the lighter ticer has not been “fully loading the rod.”
Surfcasting Tips for Beginners New Zealand
The author Allan Burgess with a sevengill shark taken surfcasting from the beach at Birdlings Flat.

Looked at another way when the rod is bent under a load of casting it is acting as a store of energy. This energy being imparted into the sinker to propel it forward. If the rod is not fully loaded because the sinker is too light then it is not storing the maximum amount of energy possible. Yet another way of looking at it is to think of the rod as an archery bow. If the bow-string isn’t fully pulled back you will not get the maximum distance from the arrow when fired.

Obviously, at the outer extreme, a very powerful rod requires a strong fit person to obtain maximum tip speed during the cast. Without sufficient muscle strength, you still won’t be able to fully load the rod even if the sinker weight is a perfect match. As with a powerful bow, you won’t get maximum distance from the arrow if you lack the strength to draw the string all the way back.

Surfcasting Reels

Reels have also become much less expensive in recent years. A fixed spool (eggbeater) is by far the most popular choice for most surfcasters. An eggbeater reel is by far the best option for a complete beginner to cast and fish with.

You eggbeater surfcasting reel should be large enough to hold around 300 metres of 11.0kg (25 lb) monofilament. This is about the right line capacity for a surf reel. There are many inexpensive reels of this type available. Surf rod and reel sets can now be bought in New Zealand for as little as NZ$60. For a better quality reel that will last a lot longer and perform better see the complete range of surfcasting reels from Tokushima. Any of these Daiwa reels would be a sound and reliable choice for a surfcasting beginner. Shimano Fishing New Zealand also has some tremendous surfcasting reels including the popular top-of-the-range Ultegra 14000 XSC.

Tokushima HK II saltwater surf fishing reel
Corrosion Resistant Spinning Reel for Saltwater and Freshwater Fishing 

Alvey Side Cast Reels

I personally prefer the Alvey side cast range of surf reels. My favourite being the 650c. These are made in Australia from the finest materials available. Their design is simple and bulletproof. Their main advantage is that there is almost no resistance to the line as it leaves the big spool. This allows lighter rigs to be cast greater distances. They are very popular in their home country, but you don’t see many here in New Zealand. Perhaps the reason is that they are more expensive than the more familiar eggbeaters and so never really caught on. I spoke once to a second-hand dealer in Christchurch who told me that used Alvey reels are very slow sellers even when sold at give-away prices!

An Alvey reel will go forever no matter how often you fish with it – or however many big fish you land on it. There are few eggbeaters you could say that about! If you do decide to get an Alvey side cast reel you need to use it with a low-mount rod or it will be awkward to cast effectively. I don’t expect many reading this to seriously consider an Alvey.  If you do get one of these Australian reels my suggestion is that you persevere with it. They are surprisingly easy to cast. But they will feel a bit strange, to begin with if you have only tried an egg-beater style surf reel.

Free Spool Surfcasting Reels

This type of reel will be a tough proposition for a novice surfcaster to master. The spool inside the reel spins when you cast making it possible to cast a considerable distance in expert hands. For many years I fished with a Seascape free-spool reel when surfcasting. This thing could cast for miles. This reel was a bit of a strange beast that was also made in Australia. It was manufactured by Wallsend Engineering near Newcastle. It had a very fast retrieve for back in the 1970s of 5.5:1. It was designed to cast and retrieve big lures for tuna from the rocks hence the high gear ratio. It would retrieve over a metre of line with every turn of the handle. Unfortunately, the pinion gear had only ten teeth and eventually split in half. A local tackle store retailer did his best to manufacture another pinion gear for me but it grates horribly when you wind the handle.

Free-spool reels will deliver excellent long distance surf casting performance. However, you have to keep a couple of things in mind if you intend using one for surfcasting. You need a large model that will hold plenty of heavy line 20-25 lb. Lighter line can easily be crushed and nicked on a stony beach. You must have a star drag reel which totally disengages the gears placing the reel in free-spool for casting. Suitable models, I have used include Abu 7000 and 10,000, the robust Shimano Speedmaster TSM4, and the Penn Mag Power. These reels are more expensive. They cost as much as six times the price of a reasonable eggbeater.

Free-spool reels require a bit of thought before casting if you are to avoid the dreaded “birds nest.” This is caused by the spool revolving and paying out line faster than the sinker is taking it away. It can occur in mid-cast as well as when your sinker splashes down. The answer is to tighten the knobs on your reel’s side plates so that the sinker only drops to the ground in free-spool if you lightly jerk the rod. When you first get to the beach it is best to slightly overtighten the spool, to begin with, make a few casts, then back it off a little at a time. A sinker and baited hooks are more difficult to cast than a salmon ticer because of greater wind resistance. For this reason, it is better to use small baits. Better still employ Breakaway bait shields if possible. Also, try to cast baits and sinkers of a consistent size and weight. For surfcasting, it is also a good idea to leave all the brake blocks in place. When selecting a free-spool reel remember that a big heavy spool is harder to control than a small lighter one so pick the smallest reel you can get away with. That said a free-spool reel is best avoided by the complete novice.

Before moving on from rods and reels I would like to conclude by saying that you don’t need an expensive surfcasting rod and reel set to catch plenty of good fish at the beach. A reliable second-hand fibreglass rod and an adequate eggbeater reel are all you need to get started.

Braid or Monofilament Fishing Line

In recent years braided fishing lines have all but taken over the market. Unlike monofilament, braid has almost no stretch which means it is far easier to feel a fish biting. Braid is much thinner in diameter than monofilament for a given breaking strain meaning you can pack more line onto a smaller reel. Fine diameter braid also casts further and cuts through wind and water much more easily than monofilament. Nowadays brain is also much less expensive than it used to be. You have to be careful casting braid with an eggbeater style reel because it can easily cut into your finger under the strain of casting. It is a good idea to wear a finger protector when casting with braid. Another good alternative is to use a heavy monofilament shock leader at the end of the braid mainline.

Shock Leaders

A shock leader and lighter line are one way to solve the problem of bust-offs when casting. In this way, you can fish 20 lb mono on the spool with say two-rod lengths of 40 lb shock leader. You can also use a similar length of 50 lb (24 kg) monofilament as a shock leader when fishing braid to avoid finger cuts. Nowadays many surfcasters will spool their eggbeater reel with 50 lb braid only. If you do you should use either a finger pad or one of the small devices available, like the Saltec thumb-caster, to avoid lines cuts.

Terminal Rigs

A terminal rig also called a trace by surfcasters, is the hook and sinker arrangement tied to the end of your line and cast out to catch a fish! There are two ways of obtaining terminal rigs; you can either buy them from a tackle store; or tie up your own. The second option will be the least expensive and is quite simple if you take your time. Bought terminal rigs will cost around NZ$10.00 each. There are a huge range of different rigs available in stores. You generally only need a couple of different types. However, for this article Surfcasting Tips for Beginners New Zealand, we are going to keep it simple and get you set up with the just one rig; the Paternoster. This all the most important rig to learn to tie. For many surfcasters, it is the only rig they ever need or use. You will be able to catch anything on this rig from small yellow-eyed mullet all the way up to big 8 foot sharks. It is just a case of using heavier line and larger hooks to target bigger fish.

Paternoster Terminal Rig

There are two basic ways of tying this rig yourself. Firstly you can use three-way swivels to make a simple-to-tie yet very strong rig for which you need to learn just one knot: the Uni-knot. The second method requires tying a couple of dropper loops into a length of 24 kg monofilament. Tying these loops is a bit tricky for a beginner but if you take your time and have a bit of practice I’m sure you can do it. We are using 24 kg mono because it will take most fish like kahawai, snapper, cod and so on, yet it will be forgiving and less prone to snap under casting pressure. If you try to tie traces from 9kg (20 lb) monofilament and cast them hard with a 150 gm (6 oz) sinker, the whole rig will bust off when you cast.
Paternoster Rig from The Complete Guide to Surfcasting by Allan Burges
Paternoster Rig from The Complete Guide to Surfcasting by Allan Burgess

Try to keep the overall length of the Paternoster casting rig, baited hooks and sinker to less than 1.5 meters otherwise it will be difficult to cast without a tangle. You should take about half a dozen rigs to the beach for each rod being fished in the case of losses. The loss of your terminal rig can be caused by your line getting accidentally wrapped around your rod tip prior to casting. Then when you cast you hear a nasty crack sound like a rifle shot as your line breaks but your rig heads out to sea. Losses also occur from your gear snagging on the bottom or being covered over by sand or shingle moving on the seabed. In the later case wind in your line after just a few minutes when you first get to the beach and start fishing until you know you are not getting your gear buried by wave action.

Tie up your rigs at home, when you are less stressed, and store them in a plastic ziplock back without the sinker. This saves heaps of time at the beach especially if you have a couple of youngsters fishing with you. Otherwise, you might find yourself tying up rigs the whole time you are at the beach!
Surfcasting Tips for Beginners New Zealand Kaikoura surf angler. Paternoster rig.
Paternoster Shark Rig from The Complete Guide to Surfcasting by Allan Burgess


Surfcasting Hooks

Again we are going to keep it simple. There are many different types, shapes, and sizes of surfcasting hooks to choose from. I suggest you use a size 3/0 suicide style chemically sharpened hook coloured red or black. These will take kahawai, snapper, moki, cod, and big sharks no problem at all. They are all you need.

Bait for Surfcasting

Perhaps the easiest bait to obtain and deal with is a frozen squid. It is available from tackle stores, service stations, dairies and supermarkets. Squid will take big snapper, kahawai, sharks, and almost anything else. If you are targeting fish that normally eat crabs and shellfish, like elephant fish and rig shark, then you are better to use these types of baits. These two species along with moki will also readily take raw or cooked prawns and shrimp available at supermarkets. The best bait for moki and rig is probably crayfish (lobster tail) and crab. This requires a bit of forward planning such as a trip to the New Brighton Pier or somewhere similar to catch small crabs to use as surfcasting bait later.

Surfcasting Tips for Beginners New Zealand crayfish.
Crayfish (rock lobster) used as bait for moki during Kaikoura Surfcasting Competition. It worked too!

Targeting particular species with baits they are more inclined to take is a well-proven fishing method that works. However, I have caught at least a dozen or more elephant fish on frozen squid bait. If you are fishing an area where there are plenty of fish, bait selection is less important than having your line in the water. A good strategy is to take along a variety of baits with you to the beach if you can. Either mix baits on the same hook or bait each hook with a different bait to find out which bait the fish are inclined to take. In my experience dogfish will take just about anything that will fit in their mouths.

I like to use yellow-eyed mullet for surfcasting bait. It will out-fish anything for red cod and is readily taken by most species. Yellow-eyed mullet fishing is an enjoyable trip in itself. You can find tuatua on many sandy beaches at low tide. Store them in your freezer and take a few with you when you go surfcasting. The same applies to mussels that can be found on rocks at low tide. Bait catching and gathering are important skills for the surfcaster to learn.

Where to go Surfcasting

In any area of New Zealand, there will be a number of popular surfcasting beaches along the coastline. A good place to start looking for surfcasting beaches near you is in the book Spot X Surfcasting New Zealand by Mark Draper. This book lists 400 surfcasting venues all around New Zealand including quite a few that are in isolated out-of-the-way places few people will fish. there is also a later edition available which lists 561 surfcasting spots.

Surfcasting Spots in Canterbury:
South Canterbury to North Otago
All of the steeply shelving shingle beaches between Banks Peninsula and Oamaru will produce sharks, red cod, elephantfish and kahawai, and other species. Here is a big sevengill shark caught by Wayne near the mouth of the Rangitata River.
Surfcasting Spots in Nelson Marlborough
When to go Surfcasting

Generally, you will want to plan a surfcasting trip so that you are fishing the incoming tide. It is also preferable to fish a beach when the wind is blowing out to sea. On a steeply shelving shingle beach you have a bit more leeway to fish the tides and will usually be fishing into deeper water. Even so, you are still best to time your fishing trip to make the best of the incoming tide.

Many beginners will be unaware that some of the best surfcasting actually takes place at night. Fish will come right in close to shore under the cover of darkness. Always set up you gear while it is still light. Take a good torch with you and fix a tip light to your surf rod so you can tell if a fish has taken your bait at night.

Conclusion and Final Tips

I hope you have enjoyed Surfcasting Tips for Beginners New Zealand. The next thing is to get out on the beaches and start fishing. Like all fishermen, you’ll have good days, and not so good days. Some surfcasting trips will be more productive in terms of fish caught than others. Every trip to the beach is a learning experience. Keep a diary in an old notebook. Each time you go surfcasting record the place, swell, sea-conditions (water clarity), wind direction, bait used, fish caught, and any other important observations. As time goes on you quickly build up a picture of when, and where, is the best time to go fishing. There is nothing quite like the excitement of approaching the beach to discover a big school of kahawai right in the breakers. With your heart pounding you struggle to thread your line up through your rod guides.

Surfcasting is great fun for the whole family. Nothing beats a day or an evening spent at the beach fishing. You never quite know which species of fish you might catch next. Nothing quite prepares you for when the times comes, and you are sitting in your folding chair looking out to sea, then suddenly you realise your rod is bent right over in the beach spike! Stay calm. Don’t panic! Don’t forget to send us a picture of your fish when you catch it. Good luck – Allan Burgess.

Tuesday, February 28, 2017

Jig Fishing For Bass

No lure is more versatile for bass fishing than the skirted jig. The jig-head with a rubber skirt combination has been around for years, and it continues to catch bass across all seasons and anywhere bass swim. Over the years, jigs have evolved and become more specialized, which has only added to their effectiveness. In this article, we will cover the major categories of jigs, the gear needed, how to fish them, and some modifications that enable you to get the most out of these lures.

Gear Required

Jig fishing works best on baitcasting equipment for several reasons: they are generally used with heavier line around thicker cover, and the weight of the lures makes them better on heavier baitcasting gear. A rod that is between 7’ and 7’6” in length with a medium-heavy action is an ideal jig rod. A baitcasting reel spooled with 12–17lb test fluorocarbon line rounds out the entire combination. The rod and reel should be sensitive enough to detect bites yet strong enough to get a good hookset when a bass bites your jig.

Jig Types

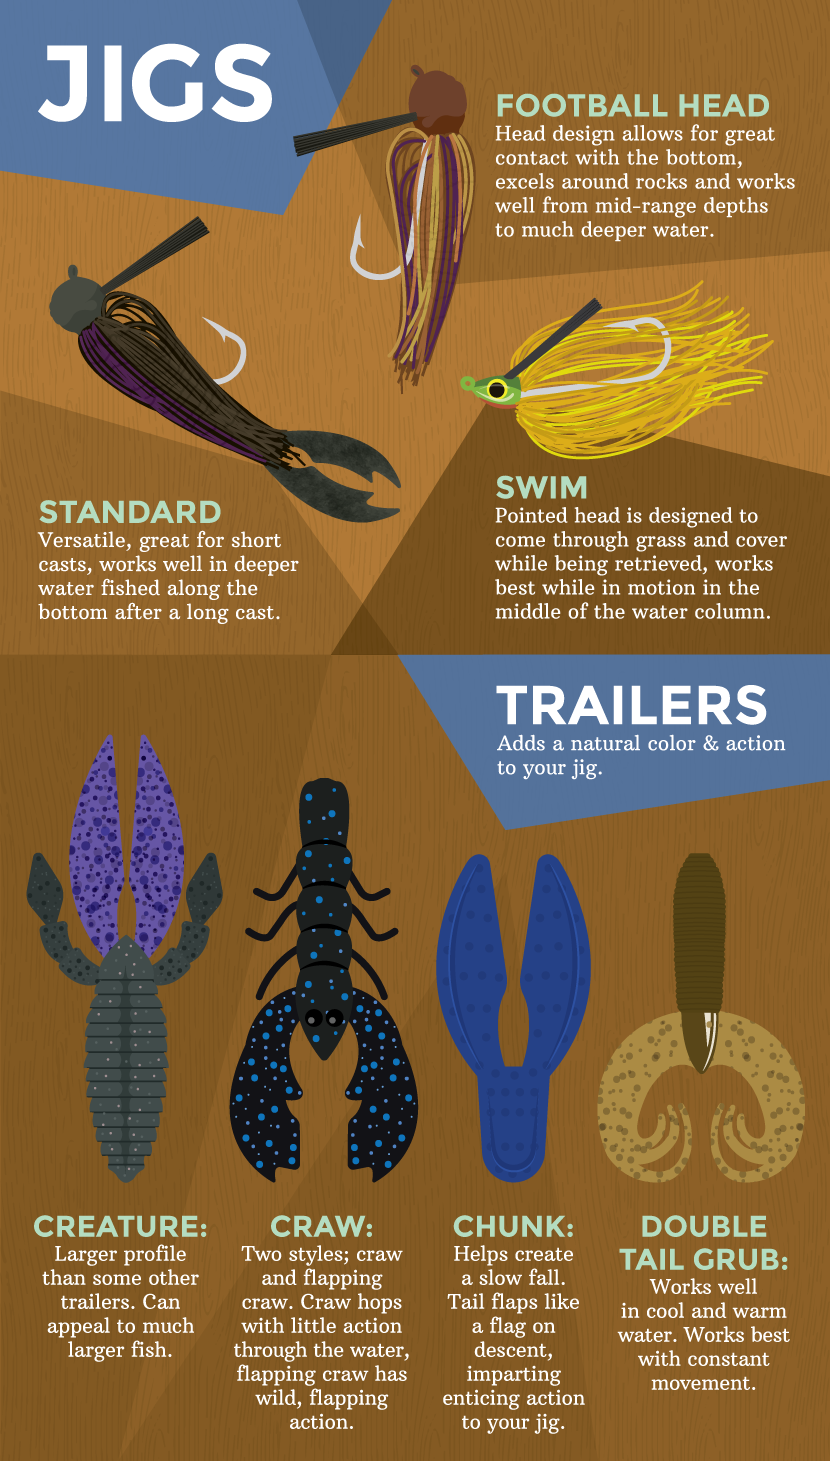
Standard Jig

The standard jig works great for short casts to submerged cover, but it works equally well in deeper water fished along the bottom after a long cast. These jigs are among the most versatile and common of all bass lures. The 3/8oz and 1/2oz sizes work well in nearly all situations, but sometimes heavier or lighter jigs are better. The lighter style works better in shallower water or when anglers want a slower fall from their jig, and the heavier models are better for deeper water.

Football Head Jigs

Like the name implies, the football head has a unique head design that resembles the shape of a football. This design allows great contact with the bottom, enabling you to stay in touch with your lure while not hanging up as much as with other jigs due to the head design. These jigs excel around rocks, and they work well from mid-range depths to much deeper water. Ideally, a football head works best in water between 10 and 50 feet deep. When it comes to sizes, the 1/2oz football head will cover most situations, but lighter jigs will allow an angler to get a slower fall. Heavier jigs, from 1/2oz to over 1oz, work well in heavy current or deep water.

Swim Jigs

Any jig could theoretically be used with a swimming retrieve, but the swim jig is specially designed with a pointed head to come through grass and cover while being retrieved. While most jigs are best when making contact with the bottom, the swim jig is best in motion in the middle of the water column. The swim jig is effective in shallow water less than ten feet deep and anywhere there is grass or wooden cover in the water. Since swim jigs are normally fished in shallow water, they are often much lighter than other popular jig types. Swim jigs sized 3/16 or 1/4oz are popular sizes, with 3/8oz being among the heaviest swim jigs bass anglers use.

Trailers

The trailer added to the end affects the action of the bait, the forage it is emulating, and the overall appearance of the jig. Soft plastic trailers are the most popular option for their convenience and array of styles and colors available. When rigging the trailer to your jig, it is important to make sure it is rigged straight on the hook of the jig so the action is not affected and it appears natural.

Creatures

There are many creature baits on the market with multiple arms and appendages. While they may not look exactly like something in nature, the movement attracts bass. These work well when used as a trailer for all types of jigs, especially swim jigs.

Craws

The jig can look just like a crawfish moving along the bottom when paired with a soft plastic crawfish. They come in many colors to match all jig skirts, and the added appeal of the claws creates a total package. These work well for all styles of jigs.

Chunks

Soft plastic chunks also imitate a crawfish, with the two arms of the bait undulating with each movement of the jig. Chunks are a good option for standard jigs.

Grubs

The double-tail grub is another way to make your jig look like a crawfish or small fish swimming along. The tails look like a fleeing crawfish, and they create an enticing movement underwater. Grubs are an excellent choice for all types of jigs.

Selecting Colors

Jigs most often imitate crawfish, so colors that resemble them work well for most situations. Green pumpkin, watermelon, and other similar natural colors are good choices for most jig fishing. When fishing dirty or stained water, a black and blue jig and trailer work well to ensure that the fish can see the bait.
Jigs also imitate bluegill, sunfish, and shad if the colors match the forage. When imitating bluegill, a green pumpkin or jig with shades of blues will help “match the hatch” of what the bass are eating. When trying to imitate shad, white skirts with a white trailer work well.

Where to Use Them

The appeal of jigs when fishing for bass is that they can effectively be used in many situations. Their weedless design allows them to be fished in heavy cover. There is no wrong place to use them, but they are among the best choices for bass anglers around rocks, grass, wood, and docks.
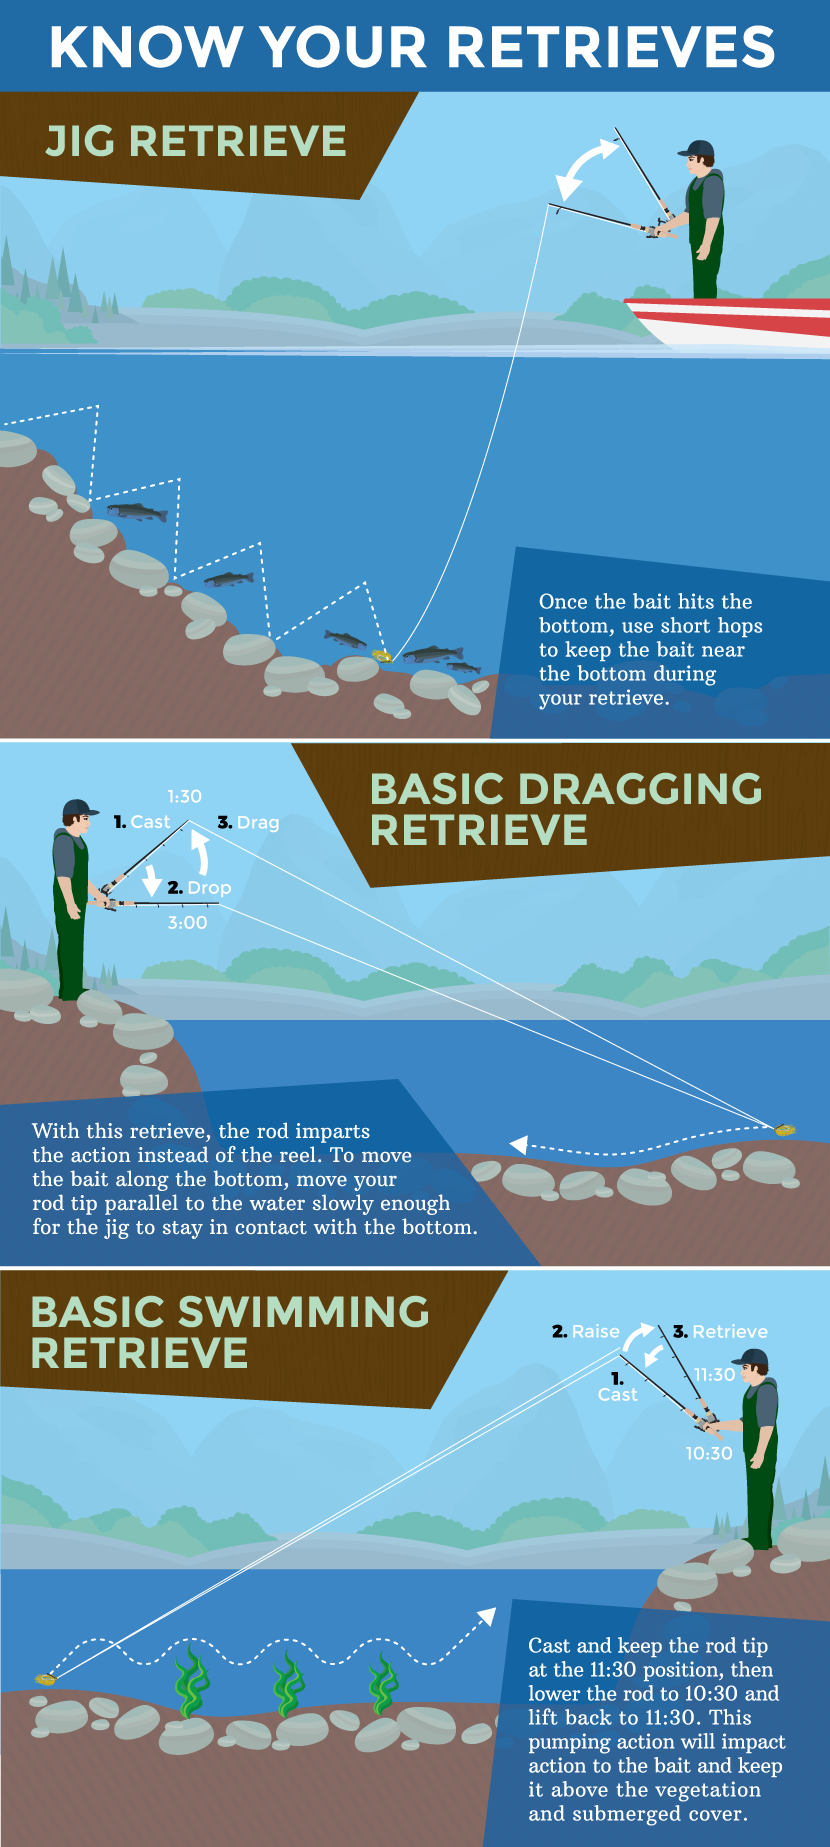
Know Your Retrieves

Retrieves

The jig works great with short casts, pitches, and flips to visible cover. Often, the bass will grab the lure as it falls, so it is always important to watch your line as the jig is falling. Once the bait hits the bottom, short hops that keep the bait near the bottom during your retrieve are best.
One of the best ways to use a football head is also the simplest: drag the jig along the bottom. Cast it out, let it sink, and then use your rod to slowly move the bait along the bottom before you reel to pull in the slack. The football head can also be used with short hops along the bottom.
The swim jig can be fished with a steady retrieve back to you. Small movements with your rod and pumps with your rod will allow the bait to move up and down in the water column as you retrieve your bait.

Modifications

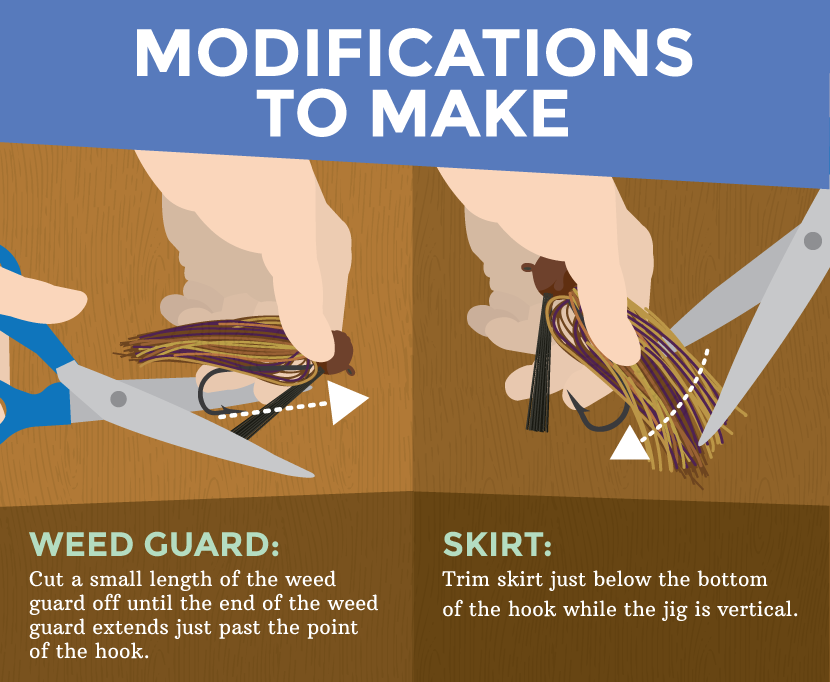
A jig right out of the package is ready to catch fish, but two simple modifications can increase hookups and change the action of the lure: trimming the weedguard and skirt.
Most jigs come equipped with weedguards to protect the hook from weeds, rocks, and debris. They work great for keeping you from snagging into cover, but they are often stiff and too long. To adjust the length of the weedguard, cut a small length of the weedguard off with scissors. An approximately ¼-inch section is usually best as long as the end of the weedguard is still longer than the point of the hook.
Another modification many bass anglers use is to trim the length of the skirt. By cutting it just below the bottom of the hook while the jig is vertical, you can get a more compact appearance for your jig.
The three major types of jigs will allow you to fish nearly all depths and catch bass in all seasons. The jig is one of the most versatile bass lures, and it has a reputation as being one of the best ways to catch a big bass. By selecting the right style of jig, utilizing the correct retrieve, and matching the appropriate skirt color and trailer, you can maximize your success when fishing jigs.
Embed the article on your site

Monday, February 13, 2017

Tips for Fishing with Kids Share6 Pin170 Tweet Email

I’ve grown up with fishermen on both sides of my family, and now that we are near a pond I can’t wait to take my own kids fishing all the time. Here are some tips for fishing with kids (that I’ve gleaned from my own life, friends, and Google).
This is a sponsored post written by me on behalf of Shakespeare® for IZEA. All opinions are 100% mine.
Awesome tips for fishing with kids
I come from a family of fishermen! We live very near the coast and directly near tons of ponds and lakes. My father and his brothers have fished their whole life. My maternal grandfather actually set up an area in his barn for his fishing equipment and boat. Oh and he actually built a special station just outside of the barn with a sink for scaling fish.
Fishing is serious business, folks.
Now we live on the family property and we’ve got a pond! I’ve been thinking about getting fishing poles for the kids for a few months now so was so excited to jump start the process when Shakespeare and Stren contacted me. Let’s just say the kids were so excited to open the boxes up and start fishing.
We’re on a mission to make fishing a regular part of our lives (hello, free food) because it’s just so good to have things to do that don’t involve technology. We’ve recently stopped watching TV during the week at all (because it stops the whining) and particularly in the summer it’s nice to have things to do outside.
Plus, I see fishing as an investment in your family. It’s time together to talk, make memories, and get some good ole Vitamin D. One thing I did learn while being together with the kids out there is that, if they are little, you might to consider taking one child at a time. This is good for both relationship building, and also so you can actually fish instead of just trying to get everyone from hooking each other.

Make it easy

If you don’t have any fishing equipment, start easy. We actually have a lot of fishing equipment in our barn since my grandfather was a lifelong fisherman, but it’s dusty and old and I don’t know what goes where. These fishing combos save you all that trouble and come with a small tackle box that has everything you need to get started and instructions! Oh and they come pre-spooled which is a total lifesaver for newbies. My husband was not excited about spooling the fishing line himself. Ha.
kids fishing

Change your expectations. 

If you’ve gone fishing previously it might have been a relaxing time for you. Maybe you put the pole in a PVC pipe in the ground and sit down and relax. If there are kids and hooks, however, it won’t start out relaxing. In fact, it might take years until you feel that a fishing trip feels like a calming family bonding time. Also, it might feel like a lot of work for a few fish. But that’s where we have to stop thinking things aren’t “worth it” on our end. I’m sure it’ll be “worth it” to them!

Avoid the baby poles. 

Lots of people (and blogs) say to avoid the very small child poles. They aren’t even that cheap money wise, but you get a cheap line and they won’t grow with your child. A youth pole is different than a child pole, and youth poles will grow with your small child until adolescence. The very small toddler pole is not generally recommended.

Practice casting.

Looking for some fishing tips with children? Here's how to plant a love of fishing in your children.
I went trout fishing in Scotland with a lifelong best friend. It was completely awesome in every way except that I didn’t’ actually catch a fish. They told me I was a pro at casting! Ha. I remember growing up fishing occasionally and I was far more excited about casting well than catching a fish. Weird, but true. Anyway, if you have more than one child who’s going fishing let them practice casting away from the other siblings. Let each child practice casting in a short distance at first, then farther and farther. Before you put bait on the hook, let them practice.
Above is my daughter “practicing” before we’ve even threaded the fishing line and put hooks on. :)

Live bait. 

Life's too short to fish with a dead cricket
Obviously this isn’t a necessity, but I personally think live bait is the most fun and interesting for kids. Depending on their age, worms may be more exciting than the actual fishing :). That said, it’s important to pick the right bait for kids because you want your kids to experience big wins so they catch a love for fishing. According to Take Me Fishing, you want your bait to be approximately the same size as your hook. Worms or crickets are fine, but maybe cut the bait to fit the size of the hook.
Our neighbor and friend, Jason, said we could keep crickets and warms as well and that would add to the excitement. Actually he called the worm wigglers. We’re going to the local bait shop to get some soon. If we can’t get a dog we can get crickets, right?

Just bring them along. 

If you’re thinking of taking kids fishing, but aren’t sure where to start, just go to ponds, lakes, or fishing holes with your kids. Even toddlers will enjoy a walk in nature. Look at the pond for fish, talk about fishing, eat some fish! Just get them out there and exposed and build anticipation. Anticipation makes things so much more fun!
Matt fishing

Fish where the fish are. 

Now there are fish in our pond, but there aren’t tons. Fishing in our own pond goes against this, but it’s easy. So convenience wins! That said, if you want to get your children into fishing go fish where the fish are. This will mean the kids actually get to experience the excitement of catching a fish regularly that first time. Whether you throw them back (fun in itself) or bring them home, your kids be more excited about fishing again when they’ve experienced some success.

Keep time limits short. 

If everyone’s having fun, by all means stay. But as children begin to fish, particularly if they aren’t catching anything, don’t plan an all day fishing expedition. A few hours may be enough, or even one hour if it’s one of the first few times you go. Bring snacks, blankets, or chairs for the kids to sit down if you’re fishing at a pond or lake.

Go barb-less.

You can actually get barb-less hooks (or wiggle the barb off with your thumbs, apparently) to help your kids practice casting without worrying about hooking someone else. I am definitely doing this because in order to actually go fishing with all my kids (ages 4, 3, and 2 years in August) I want it to be a safe environment. And my youngest will totally want to mill around and play, but will not understand not to walk in the path of a flying line!

Want to win a fishing trip?

 If you’d like to win a fishing trip visit this site, tell them of one of your favorite fishing memories and upload a picture of you fishing!
Have fun! 
Check out the fishing combo available from Shakespeare and Stren and after you do, use the fishing checklist to make sure you’re all set!
Great fishing tips for kids
Visit Sponsors Site I’ve created a free email series just for you! I believe just because you have kids doesn’t mean your life turns to chaos. Sure, things can get crazy at times, but you can raise children who are confident, kind, fun-loving, and who… best of all… listen when you speak. After this free series:
  • you’ll have a connection with your kids that fuels peace
  • your days flow smoother and the kids make transitions without fuss
  • consequences will no longer be a mystery or a struggle
  • the kids will actually help out around the home
  • you’ll have mastered the #1 way to take your home from chaos to peace

Monday, February 6, 2017

Surf Fishing Tips and Techniques

Top Tips For Surf Fishing

A compilation of some great surf-fishing tips to help you find and hook lots more fish.
  • How to find the fish you are after
  • Tips on rigs and bait for some popular surf fish
  • Types of rigs
  • Types of bait
  • Tips on cost-effective fishing equipment

Definition of "Fishing"

fish*ing (fish`ing) n. The art of casting, trolling, jigging, or spinning while freezing, sweating, swatting, or swearing.
Surf Fishing Tips: Finding the Fish
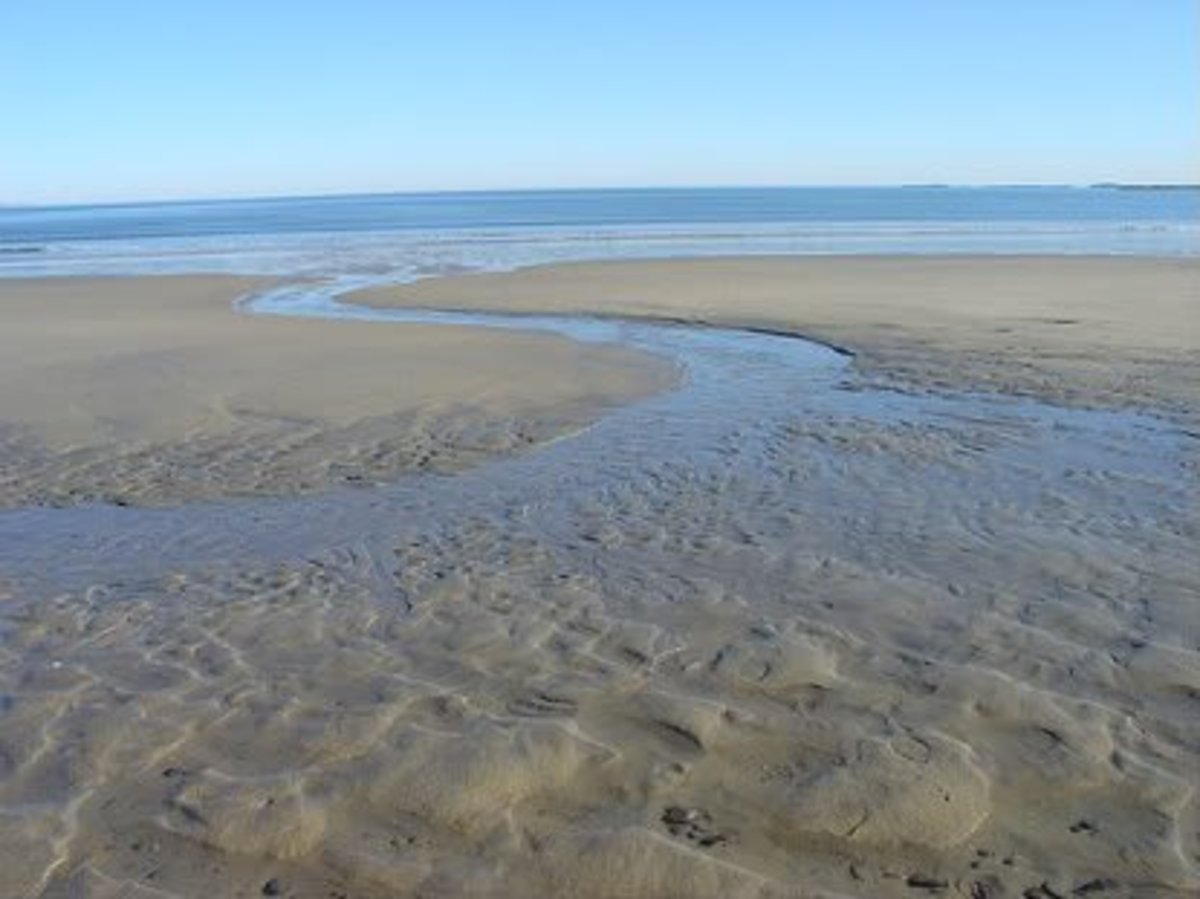
One of the the best tips for locating fish is to go and check out your chosen beach at low tide before your expedition. Make a note of where the dips, hollows, and sandbanks are. This will give you a great indication of where the fish are likely to be feeding when the tide comes in. Look out for points of land that jut out into the ocean; you will generally find fish on either side of these features.
The best time to surf fish is always around high tide, especially if high tide falls at either dawn or dusk.
Check out the area at low tide, return at high tide.
Another great surf fishing tip is to go and talk to a local tackle shop that is close to the beach you are intending to fish. These places are fantastic for gathering information about the fish species currently being caught, where and when they are being caught, and what baits are being used.

How Far to Cast?

Don't overdo it!

Sometimes the fish are much closer than you think . . .
"All Americans believe that they are born fishermen. For a man to admit to a distaste for fishing would be like denouncing mother-love and hating moonlight."

John Steinbeck -1954
Rigs and Baits for Some Favorite Surf Fish
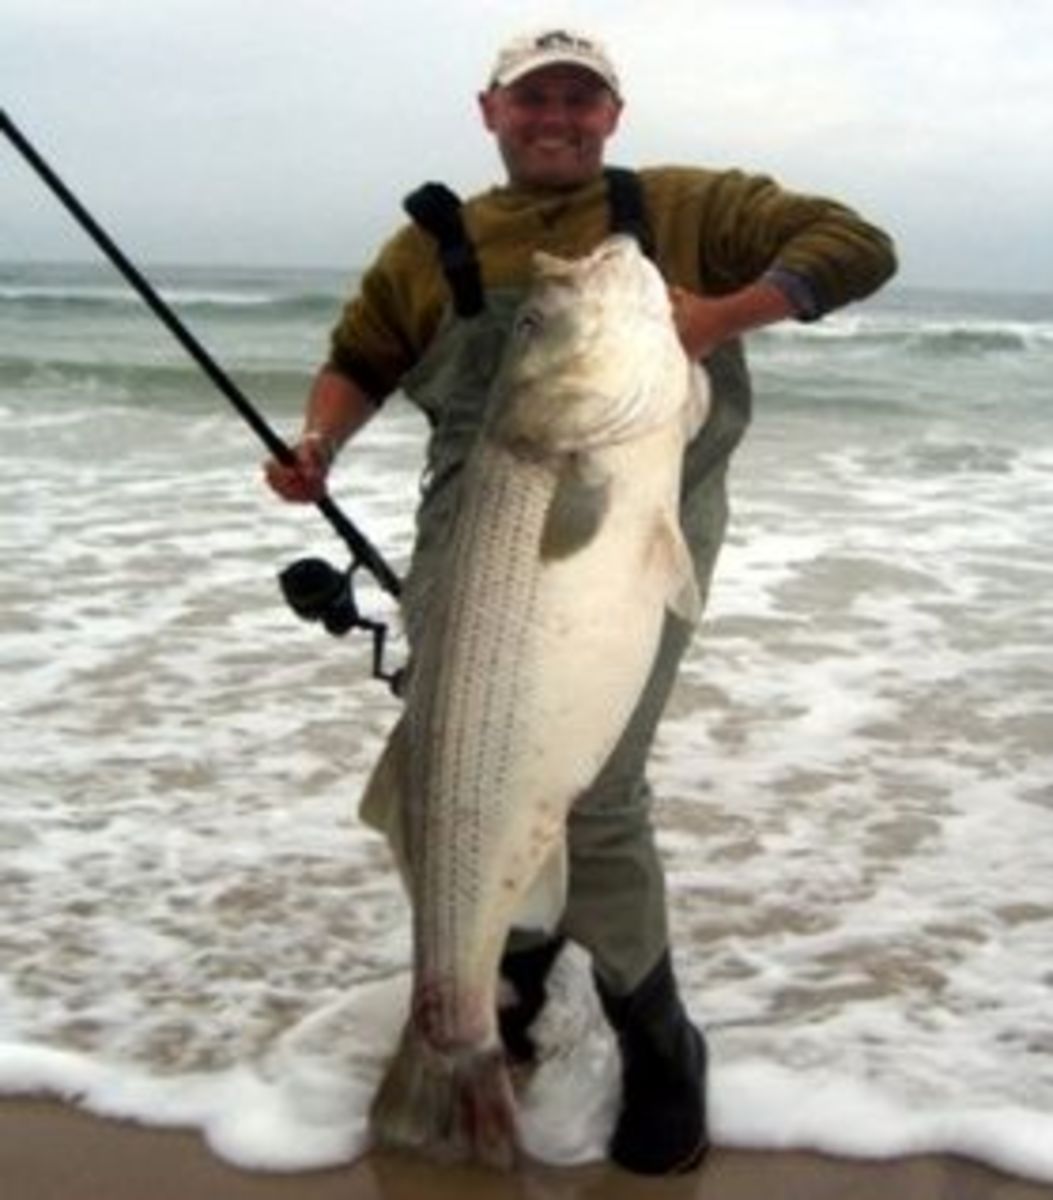
Monsters in the surf!  A 55-pound striped bass.
Monsters in the surf! A 55-pound striped bass.

Surf Fishing Tips for Striped Bass

If you are a surf angler, hooking a sizable striped bass in the surf is one of the most exciting experiences you can have. The secret is choosing the right rig and the right bait for the job. Here are my two favorite surf fishing rigs for this sought-after fish.

The Fish-Finder Rig for Striped Bass

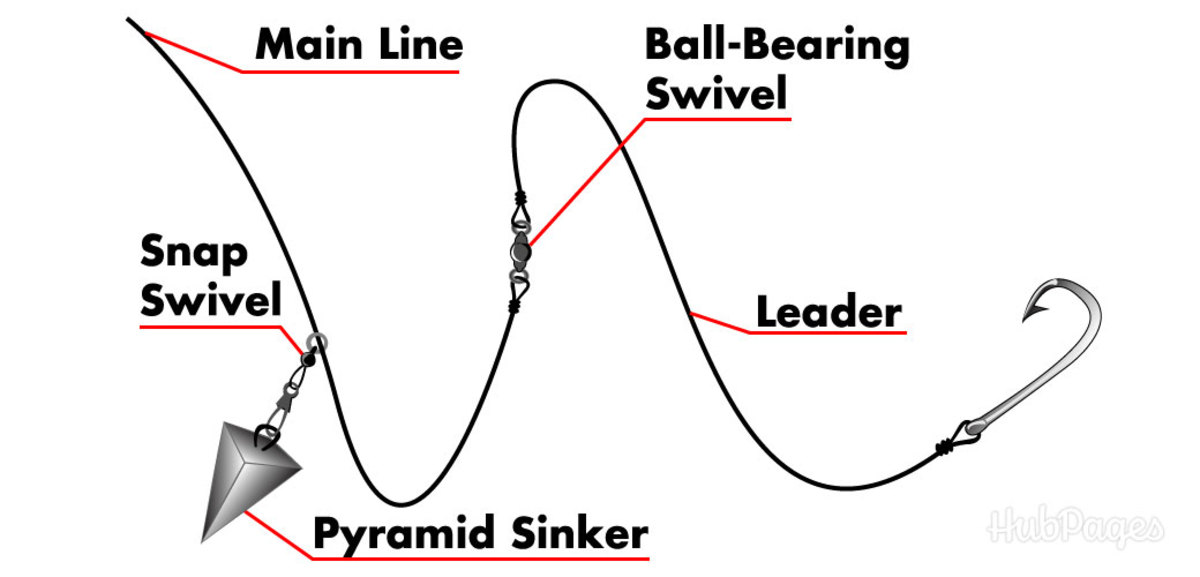
The fish-finder rig (illustrated further down in this article) works well for bass because it allows the live bait to move naturally in the current. Use live bait; eels hooked through the the tail are always the top choice, followed by either menhaden or herring. Leader length between hook and swivel should be around 20 inches. Attaching a weight slide above the swivel will make the bait presentation much better than in a fixed version. Striped bass have excellent eyesight, so try to keep the rig as simple as possible.

The High-Low Rig for Striped Bass

There are also many versions of the high-low rig, but this is the one that seems to catch the most striped bass. This rig works well because smaller bass tend to sit higher in the water while the larger fish will stay closer to the bottom. For this surf fishing rig, tie two 5-inch dropper loops on a 5-foot length of leader, keeping the loops around 12 inches apart, and tie your hooks to the end of the loops. Fifteen inches below the bottom loop attach a weight snap, and 15 inches above the top loop tie on a swivel for the main line. This rig works by getting the fish to hook themselves, so circle hooks will work the best. Try using a larger bait like bunker chunks on the bottom loop, and a slightly smaller bait like blood worms for the top loop.

Surf Fishing Tips For Red Drum

Red drum
Red drum

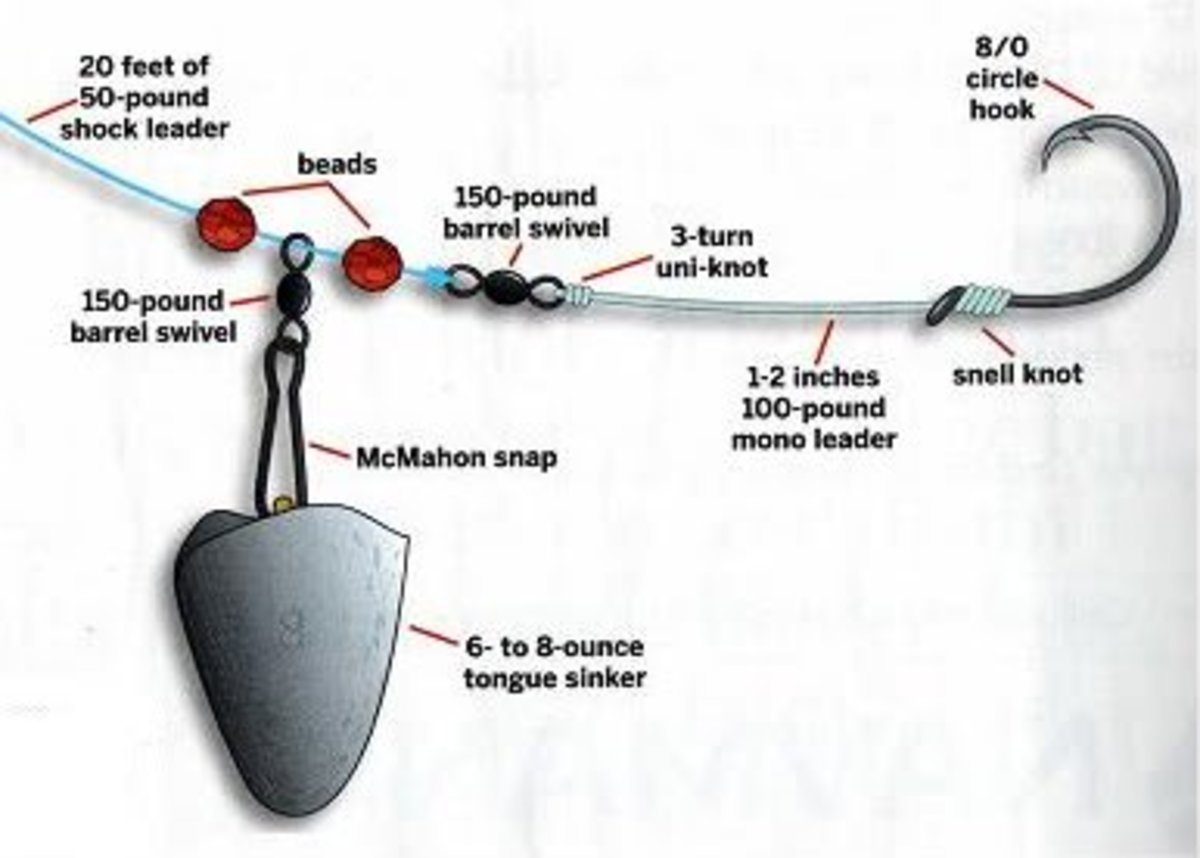
Red Drum Rig

If you are after red drum, you will have to beef up your end tackle. IIustrated below is a rig that should hold most large red drum.
For live baits try using live menhaden or shrimp. Chunks of crab also work well.
A rig for large red drum

Surf Fishing Tips For Bluefish

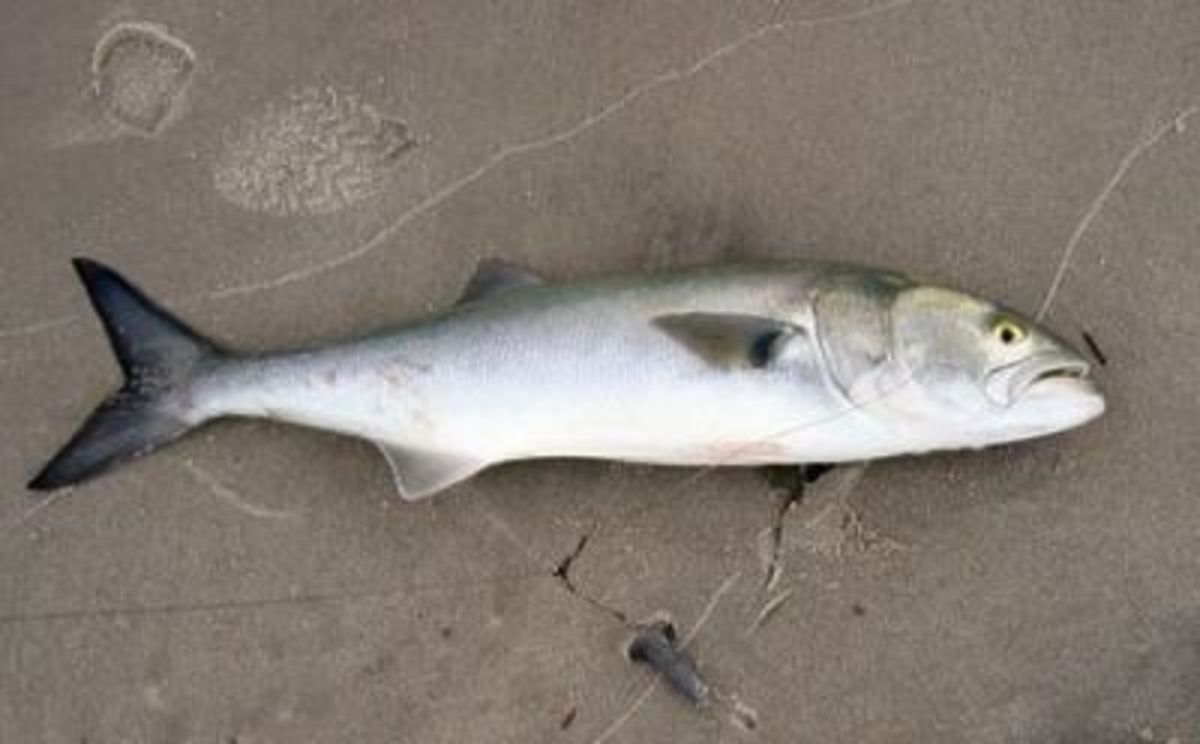
Bluefish
Bluefish
The bluefish has extremely sharp teeth, so regardless of which rig you choose, a wire leader is advisable. The best bait rig to use is the fish finder rig. The wire leader length should be around 18 inches between hook and swivel. Put a weight slide on the main line and then tie the main line to the swivel. Bluefish have very good vision, so a free-lining rig helps the bait look as natural as possible. Bluefish are ferocious feeders and travel in large schools hunting smaller bait fish, so for live baits try menhaden, mullet, eels, and shrimp. They will also take most cut fish baits, with mullet being a favorite.
Lures For Bluefish
The majority of surf fishermen prefer to use artificial lures to catch bluefish. There are many lures you can use; popular ones are surface plugs, swimming plugs, jigs, and spoons. A fast stop-and-go retrieval will work the best for these fish, especially when using surface plugs. My personal favorite is a heavy silver spoon, which will cast a good distance and retrieve at speed. A good tip is to lace the spoon with a cut strip of mullet or similar fish; this will leave a strong scent trail as you retrieve the spoon. Spraying your lure with menhaden bait spray will have the same effect.
The average size of a school fish is two to five pounds, so light spinning tackle will give you some great sport. The bluefish has very strong jaws and sharp teeth, so when you do land it, take great care when removing the hook; use long-nosed pliers at all times.

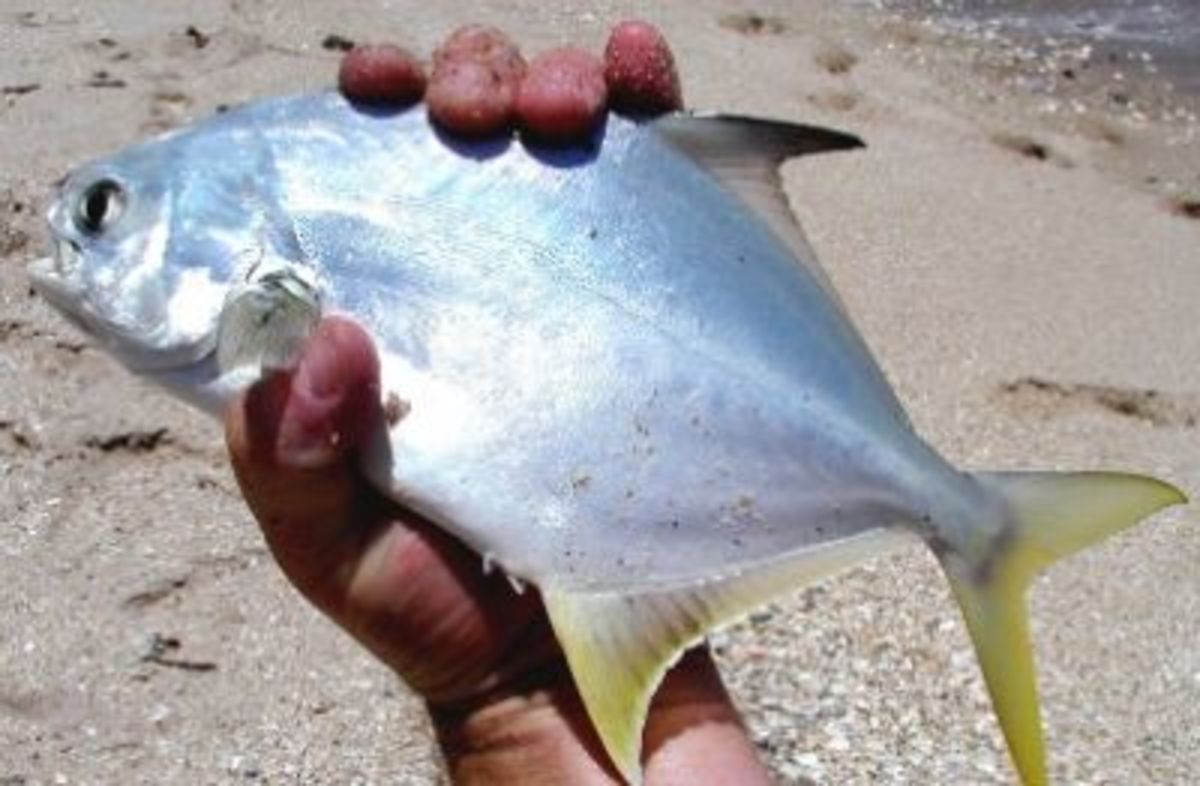
Pompano

Pompano
Pompano
Rigs

Three Popular Rigs for Surf Fishing

Don't spend too much time on end rigs. A good principle for surf fishing rigs is to keep them simple. The less there is to get tangled, the better.
Below are three very popular and simple surf fishing rigs.

The Fish-Finder Rig

The object of the fish-finder rig is to pose as little resistance as possible as your target fish picks up the bait. It is entirely your preference how long to make the leader, but the average length is around 24 inches.
It is very simple to make the fish-finder rig yourself.

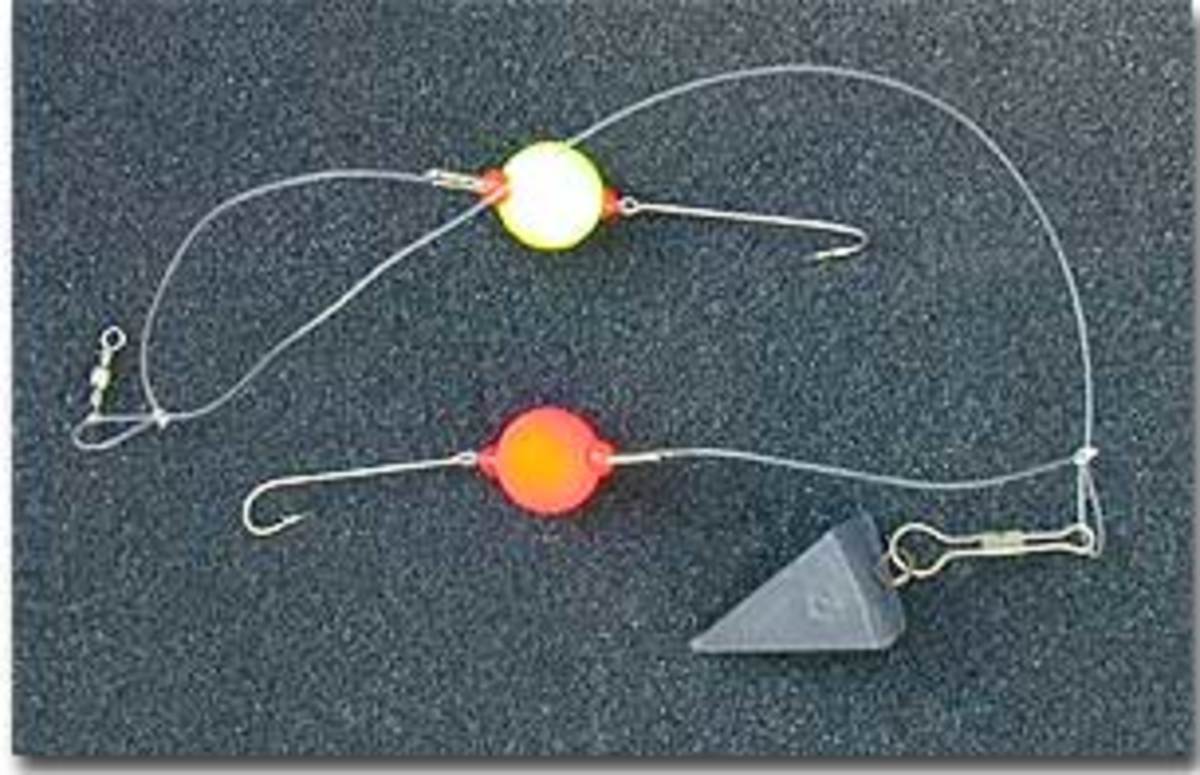
The Fireball Rig

The idea of the fireball rig is that the foam balls keep the bait slightly off the bottom. The bright colors and movement in this rig make it a great choice on days when the surf is rough and the water is cloudy.
The rig works well when fished with natural bait.
You can make up the fireball rig yourself but it is a little more involved, so it's much easier to buy them already made up.

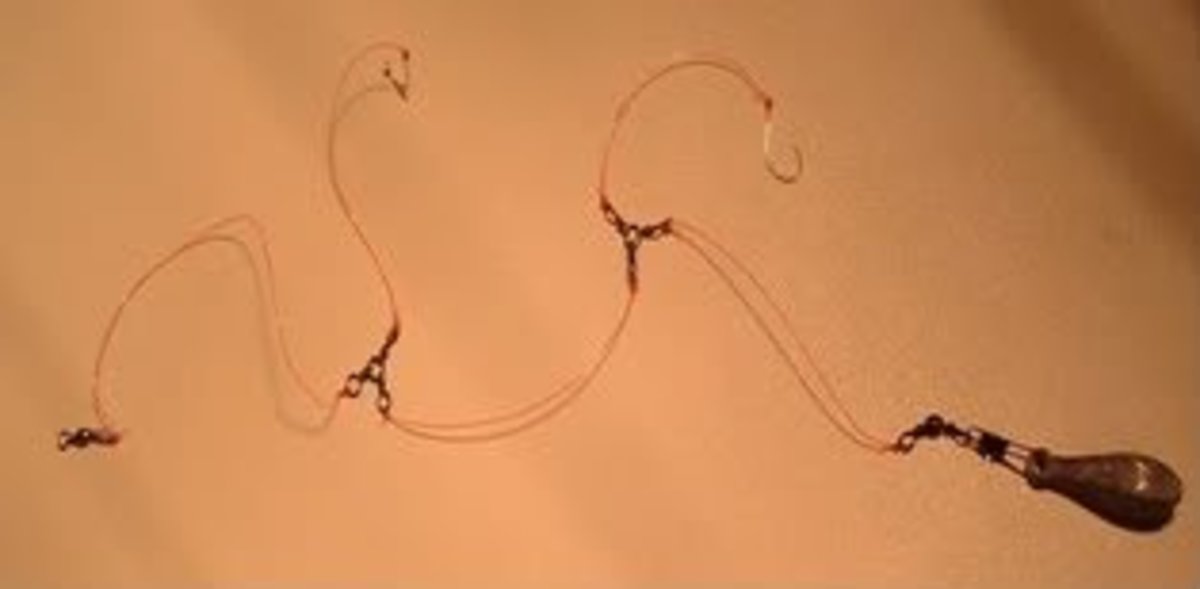
The High-Low Rig

The high-low rig is one of the best natural bait rigs there is. The rig works extremely well for most large predatory fish, and gives you the advantage of having two baits in the water. The rig can be made up fairly easily, or can be bought ready made from your tackle shop.

Video: How to Tie Your Own Dropper Loop for Making Rigs

Video: How to Tie the Rapala Knot (Slightly More Difficult)

Natural Baits

Surf Fishing Bait Tips—Which Baits for Which Fish?

Pacific mole crab digging into wet sand
Pacific mole crab digging into wet sand | Source
Mole crabs (also called sand crabs) are one of the most popular baits used for surf fishing. Dig them yourself, and keep them in some damp sand. Will catch most species, but best for redfish, whiting, pompano, striped bass, blackfish, and black drum.
Squid
Squid | Source
Squid are great bait for surf fishing. Buy them fresh or frozen, and use whole or cut into strips. Good for bluefish, striped bass, and redfish.
Ragworm
Ragworm | Source
Sandworms or ragworms are another great bait for surf fishing. Dig your own or buy from your local tackle shop.
Good for: rockfish, striped bass, flounder, whiting, blackfish, porgy, sea trout, and surf perch.
Live shrimp sold for bait
Live shrimp sold for bait | Source
Shrimp are a good all round bait, will catch just about any kind of fish! Can be used dead or live.
Mullet
Mullet | Source
Mullet are excellent bait and will catch a variety of fish. Use whole, dead or alive, for larger fish or cut strips for smaller species.
Good for: bluefish, striped bass, tarpon, redfish, and sea trout.
Fiddler crabs in a baggie
Fiddler crabs in a baggie | Source
Use crabs whole, or use pieces for smaller fish. Soft-shell crab tends to get more takers than hard-shell crab.
Good for: black drum, tarpon, redfish, and snook.
Glycera (bloodworm)
Glycera (bloodworm) | Source
Dig your own bloodworms, or buy them from your tackle shop.
Good for flounder, sea trout, striped bass, bluefish, porgy, and whiting.
Lures

Surf Fishing Lures: Surf-Fishing Tips For Artificial Bait

Always pack a good selection of plugs, spoons, and other forms of artificial baits.
Depending on what you are after, artificial bait can be just as good as, if not better than, the real thing. Find out from local anglers which lures are taking fish.

Three Lures Every Surf Angler Should Have

Surf fishing lures are a topic of much debate among surf anglers. The multitude of different sizes and colors make choosing the right one a little confusing. Here are three surf fishing lures that every surf angler should have in their bag.

Metal Spoons

Metal spoon fishing lure
Metal spoon fishing lure | Source
The large metal spoon is supposed to resemble a large bait fish such as menhaden or mullet. Most are chrome or bright silver in color. Most surf fishermen using a large metal spoon are after bluefish, but almost any fish will take them. These streamlined two- to four-ounce spoons will reach most outer bars with ease. Jigging the spoon on a medium fast retrieval tends to bring good results. If you are after bluefish remember to attach a 12-inch wire trace before the lure.

Lead-Head Soft Plastic Tail Jigs

Rubber fake fish of different colors threaded onto lead-weighted hooks
The great thing about this type of lure is the variety of combinations available. The action of the lure on retrieval will vary with your choice of tail, so always carry a few different colors and sizes in your bag for a quick change. Changing your choice of tail is a simple matter and can be done quickly and easily. You can use many types of retrieval when using the combination jig, but employing a slow and steady retrieve will see the most takes. Heavy monofilament line will affect the jig's performance, so try and use a short length of lightweight leader.

Small Metal Lures

Small metal lures don't have to be this colorful—any minnow-sized bit of metal, with or without a brushy tail, may work.
The smaller metal surf fishing lures are great for use with light spinning tackle. A seven- to nine- foot spinning rod and a reel loaded with 10- to 12-lb mono-filament main line will allow you to use this type of lure to its full effect. The lure itself is designed to resemble a minnow, and when used on a fast retrieve will attract small to medium-sized bluefish. A very slow retrieve keeping the lure close to the bottom will produce trout and smaller striped bass.
There are many more surf-fishing lures available, but these three lures will ensure you have a lure that will produce fish on almost every occasion.
Other Surf-Fishing Equipment

Surf Fishing Tips - Your Equipment - Less Is More...

The beauty of surf fishing (or any type of rod and line fishing for that matter) is that you do not need much equipment to get started. Everything you need for a day of surf fishing will fit into a small to medium-sized tackle box.
You can set yourself up with everything you need for about $120, and rod-and-reel combos start at around $60, but as with most things you get what you pay for. Spend as much as you can afford on a quality rod and reel; properly looked after, they will last you many years.
Three things I always take surf fishing:
  • Torch (flashlight)
  • Nail clippers
  • Cell phone (in a sealable plastic bag!)
review image 
Saltwater Spinning Reel for Corrosion Resistant  Buy Now  Save 10% each on New Year Discount offered Enter code L2WVCG3C

The Surf Fisherman's Friend

I've tried many blades, pliers and pocket knives over the years, but this little tool has served me well.
A handy size, lightweight and very strong, an excellent addition to any fishermans kit.

A Quick Surf-Fishing Checklist

  • Surf-fishing rod (ten- to twelve-foot medium action rod, with silicon carbide line guides and non corrosive reel seats)
  • Reel (open-faced with a bail arm; choose the best you can afford)
  • Live Bait Rigs (four or five, ready-made)
  • Surf lures (a small selection)
  • Artificial bait (a small selection)
  • Spare hardware (sinkers, hooks, swivels, etc.)
  • Tools (needle-nose pliers, knife)
  • Miscellaneous (rod spike, rags, plastic bags, baitbox/bait bucket)
You really don't need tons of gear. The barest essentials will catch just as many fish as box loads of tackle!
Above all be safe and have fun!

The Ideal Light Tackle Surf Fishing Outfit

1. It has to be made for light line - You never know what you're going to catch when surf fishing in Southern California. I prefer to fish with light line because the average barred surf perch, which is the most common catch, range from 4 to about 12" in size. They might bite on 12# or 15# but it's just a lot more fun pulling them in on a 6# outfit. The corbina, arguably the most sought after species, will usually only bite when using light line. There is always a chance that you'll hook up into a big halibut or a shark but the light tackle makes that even more fun!


2. A longer rod with fast to medium action - I prefer my light tackle surf rods to range from 7 to 10' in length and rated anywhere from 4 to 10#. My current rod is 9' and I like the longer length because it adds distance to the cast and helps to keep the line above the waves. Some people prefer shorter rods for greater control.
Action wise, I want my grub rod to be really tippy (strong and stiff butt section with a softer tip). I want something that's super sensitive and allows me to set the hook fast.

I prefer a slightly softer rod when fishing with bait (like sand crabs). A medium action rod gives the fish some more give so it can really grab the bait. It also prevents you from ripping the bait out of its mouth on the hook set.

Be careful of lighter rods that are too parabolic (it bends throughout the whole rod). A rod that's too soft or parabolic is going to make casting very difficult and harder to control.

3. A medium ranged spinning reel - The first reel that I took out surf fishing was a small Zebco spinning reel that I got at Kmart. It only lasted 5 sessions before the insides rusted and it seized up. Make sure that your reel is salt water resistant! Avoid reels with cheap bearings, cheap gears, and non-coated magnesium frames. That said, you don't have to spend too much money to get a decent light tackle surf fishing reel. Just don't go too cheap or you'll learn about the following saying the hard way. "Buy cheap, buy twice." Ask some other surf anglers for recommendations in the forums if you want to know about specific models. Also, tackle maintenance will be discussed in greater detail in a future article, but always rinse your rod and reel with freshwater after every trip.

Consider the line capacity of the reel. As mentioned above, you have a chance of hooking up with some beasts, even when fishing for small perch. It helps to have some line on your reel in case that happens. For example, I fish a 2000 sized Shimano that holds about 180yds of 6lbs line. I have some 10lbs spectra (2lbs diameter) as backing on my reel. This way I have more line on my reel, and I can save some cash by only having to replace a top shot of line rather than the whole spool (it adds up because I use P-Line CXX).

Related to having enough line is to have a solid drag system. Make sure that your drag is smooth and continuous. If it feels jerky or the drag comes off in spurts, you may want an upgrade.

Finally, try to get a reel that balances well with your rod. The light tackle surf fishing that I'm talking about requires holding your rod for hours and making repeated casts. If your wrist is hurting, you should do something to balance your outfit (change the reel or add some weight to the rod butt).

Some surf anglers also prefer bait casting reels instead of spinning, even when using light line. I agree that there are advantages to using casting reels, like letting a corbina run with the bait before setting the hook, but I personally don't like throwing 1/4oz lead heads and 1/2oz carolina rigs with casting reels. Spinning reels are a lot easier to use so I stick with them. I've never had a problem catching corbina on them either.

The above are just some recommendations but I'm going to take it back to the first sentence of the article. That old bass rod is all that you need to get into the water. It's easy to get started with surf fishing in Southern California. Give it a shot and you can worry about customizing your tackle as you get more experience.

Thursday, January 19, 2017

How To Buy A Fishing Reel

fishing reel


Getting ready for a trip to the water? Find the correct fishing reel for your outing. Whether you’re after a steelhead or a scrappy trout, learn about different types of fishing reels and how they work for you.   

Casting a Fishing Reel

Find Your Perfect Freshwater Or Saltwater Reel

Freshwater reels are for use around inland lakes, streams and rivers, while saltwater reels are for large bodies of water, including oceans and bays.
Reels come in three basic styles: casting, spinning and fly fishing. Whether you’re after a largemouth bass or a scrappy trout, you should understand the way your fishing reel works.
Baitcasting & Conventional Reels: These reels work with the weight of your bait or lure as it pulls on the line and turns the spool. They are typically preferred by more experienced anglers, especially when using heavier lures and lines for large game fish.
  • Most baitcasting reels now incorporate a drag system, which adjusts the resistance or drag on your spool and controls the level of resistance needed to pull the right length of line off the spool.
  • Many anglers prefer baitcasting reels for larger, stronger game fish, particularly if they’ll be out on the water for an extended period of time. Many saltwater anglers use baitcasting reels.
  • Some baitcasting reels come in one-piece designs that lessen the corrosive effects of saltwater
These five styles of freshwater and saltwater baitcasting reels are available to fit your needs:
Types of Fishing Rods Chart
How to Buy the Right Reel
Spinning Reels: These devices are great for beginners or novice anglers. They are simple to use and mount on the underside of a spinning rod. The handle of a spinning reel is located on the left instead of the right. The spool is parallel to the rod and does not rotate as you cast, reducing tangles.
  • Spinning reels can handle smaller bait.
  • They have anti-reverse, a simple mechanism you can set by letting go of the bail wire after casting. This keeps your line from spooling off when you get a bite.
  • You may prefer a skirted spool in saltwater environments. These increase line capacity, allowing longer casts and reducing tangles. They also protect the inside mechanisms of the spool from salt and moisture.
Spincasting Reels: With these reels, the line comes off the top of the spool while casting. The spool remains enclosed by a cover that features a port, where the end of your fishing line exits the reel. The spool remains stationary until you use a thumb button to cast. As you release the button, your bait or lure will propel your line.
  • The ease of spincasting reels makes them a good choice for novices. They’re reliable and lack complexity.

Drag Systems

The drag system of your reel applies friction to the spool. This helps as you cast and while you are attempting to bait a fish, particularly larger species.
  • Older models traditionally have a fixed drag that cannot be adjusted.
  • Spring and pawl drag systems offer some adjustment and have a distinct clicking sound when line is pulled off the reel.
  • Disc drag systems provide the smoothest type of drag. They are used in many modern fly reels.
  • Adjustable disc drags allow anglers to make fine adjustments to the level of drag pressure.
There are three types of drag systems.
  1. Spring and pawl, or “click and pawl” systems feature a spring that pushes the prawl into a gear on the reel spool to produce a drag. Spring and pawl is best for light fishing, like panfish.
  2. Disc drag pushes a large-diameter pad against the reel spool’s braking surface. Pressure is applied directly to increase overall control and efficiency. Cork or synthetic materials, like Teflon, are used in disc drag systems. Cork provides a smoother, more consistent pressure and can be easily adjusted. These systems are great for fighting large, strong fish.
  3. Caliper drag systems fall between disc and spring and pawl. A caliper pad pushes against the braking surface of the spool. This friction slows the way the reel spool spins.